Building a Smart Home Energy Monitor with Shelly Devices PoC
Resources
The measurements are done using 2 Shelly PM Mini Gen 3 power meters. The installation for these power meters is intrusive but there are non-intrusive alternatives like the Shelly Pro 3EM. A different power meter manufacturer can be used, as well as a mix of different manufacturers.
The broker platform being used is EMQX. EMQX is rich in integrations letting us route data to a local or cloud database instance or directly as an HTTP request to a webhook. It can also be used to route data to other applications for processing.
The data is routed from EMQX to Redis via Upstash. Redis is a key-value NoSQL database that supports different data formats. I have used Redis objects, but JSON can also be used. Upstash is a serverless data platform which I used for our integration with Redis. EMQX also supports routing to other cloud data-streaming services. I have made an example by routing data from EMQX to Azure Event Hub to prove its support with other systems that can be used for the centralization of the system.
For pulling and displaying the data I made a .NET application (the language being of no importance, because we are only required to support Redis to pull from a remote endpoint). Jedis can be used to make an implementation in Java.
Background
This project has been an idea for a while but I took action on its actual development after my relocation to a new apartment where I set up a boiler and an AC, the energy consumption of which, had me very interested. After doing some research and using my background from studying electrotechnics, I quickly found several options for taking measurements for energy consumption.
After deciding to go with the cheaper and more intrusive alternative, I bought 2 Shelly PM Mini Gen 3s, which are usually installed in a socket to measure the consumption out of it. Instead, I figured out how to set it in my apartment’s main distribution panel. After installing the Shellies and configuring all the details, I visited the control panel at https://control.shelly.cloud/.
The data was insightful indeed but it sparked me with a new idea - what if I connect the device to an MQTT Broker (the main protocol the shellies, and most smart meters use, as any other smart device, is MQTT). From there I got the idea to collect and pipe the data to the cloud where I’d store it and then create another client to retrieve the information and display it locally. This not only allows to collect data remotely like shelly cloud does, but it also allows the user to mix and match different smart meter manufacturers into one platform.
Process
After the initial configurations I took my time to research the topic. The documentation was quite limited but I did discover a few ways I could make my idea work with Azure IoT hubs. Attempting to do so I learned a very important thing about shelly devices - they have functionality for SSL/TLS certificates, but it doesn’t work.
Struggling with getting it to work with Azure Hubs I gave up and decided to test the shellies as a whole in terms of their MQTT connectivity. After using the HiveMQ public MQTT broker I managed to establish a connection and concluded I’d need to try something else. Experimentation led me to EMQX.
In the meantime I also made the great discovery of Shelly scripts. From there I coded a script for automating the power usage collection and sending it via MQTT to the desired topic. The data is collected and sent precisely every hour for the desired time zone.
1
2
3
4
5
6
7
8
9
10
11
12
13
14
15
16
17
18
19
20
21
22
23
24
25
26
27
28
29
30
31
32
33
34
35
if (lastHourTimestamp === 0) {
    lastHourTimestamp = Math.floor(currentTimestamp / 3600) * 3600;
}

hourlyEnergyTotal += currentEnergy - lastEnergyReading;
hourlyRetEnergyTotal += currentRetEnergy - lastRetEnergyReading;
if (currentTimestamp >= lastHourTimestamp + 3600) {
    publishHourlyUsage();
    hourlyEnergyTotal = 0;
    hourlyRetEnergyTotal = 0;
    lastHourTimestamp = Math.floor(currentTimestamp / 3600) * 3600;
}

lastEnergyReading = currentEnergy;
lastRetEnergyReading = currentRetEnergy;
}

function publishHourlyUsage() {
    if (MQTT.isConnected()) {
        let status = {
            operational: true,
            id: Shelly.getDeviceInfo().id,
            mac: Shelly.getDeviceInfo().mac,
            fw_ver: Shelly.getDeviceInfo().ver,
            hourly_energy_usage: hourlyEnergyTotal,
            hourly_ret_energy_usage: hourlyRetEnergyTotal,
            timestamp: lastHourTimestamp
        };
        MQTT.publish("/system/" + Shelly.getDeviceInfo().id + "/status", JSON.stringify(status), 0, false);
    } else {
        console.log("MQTT not connected. Skipping publish.");
    }
}

Timer.set(60 * 1000, true, updateHourlyUsage);
Using this script I configured a few pubsub routes on the remote MQTT broker (EMQX) and experimented with different options for the script. I used a feature in EMQX called a “sink” to pipe the data to my remote database which I hosted in upstash.
For the body I used this pattern:
1
2
3
4
5
6
7
8
9
{
    "fw_ver": "1.4.0-beta1",
    "hourly_energy_usage": 564.559,
    "hourly_ret_energy_usage": 0,
    "id": "shellypmminig3-ecda3bc4ddb0",
    "mac": "ECDA3BC4DDB0",
    "operational": true,
    "timestamp": 1720717200
}
For data I used the following key format:
1
prefix:devicemac_timestamp
For the device and device script I used:
1
2
device:devicemac
script:devicemac
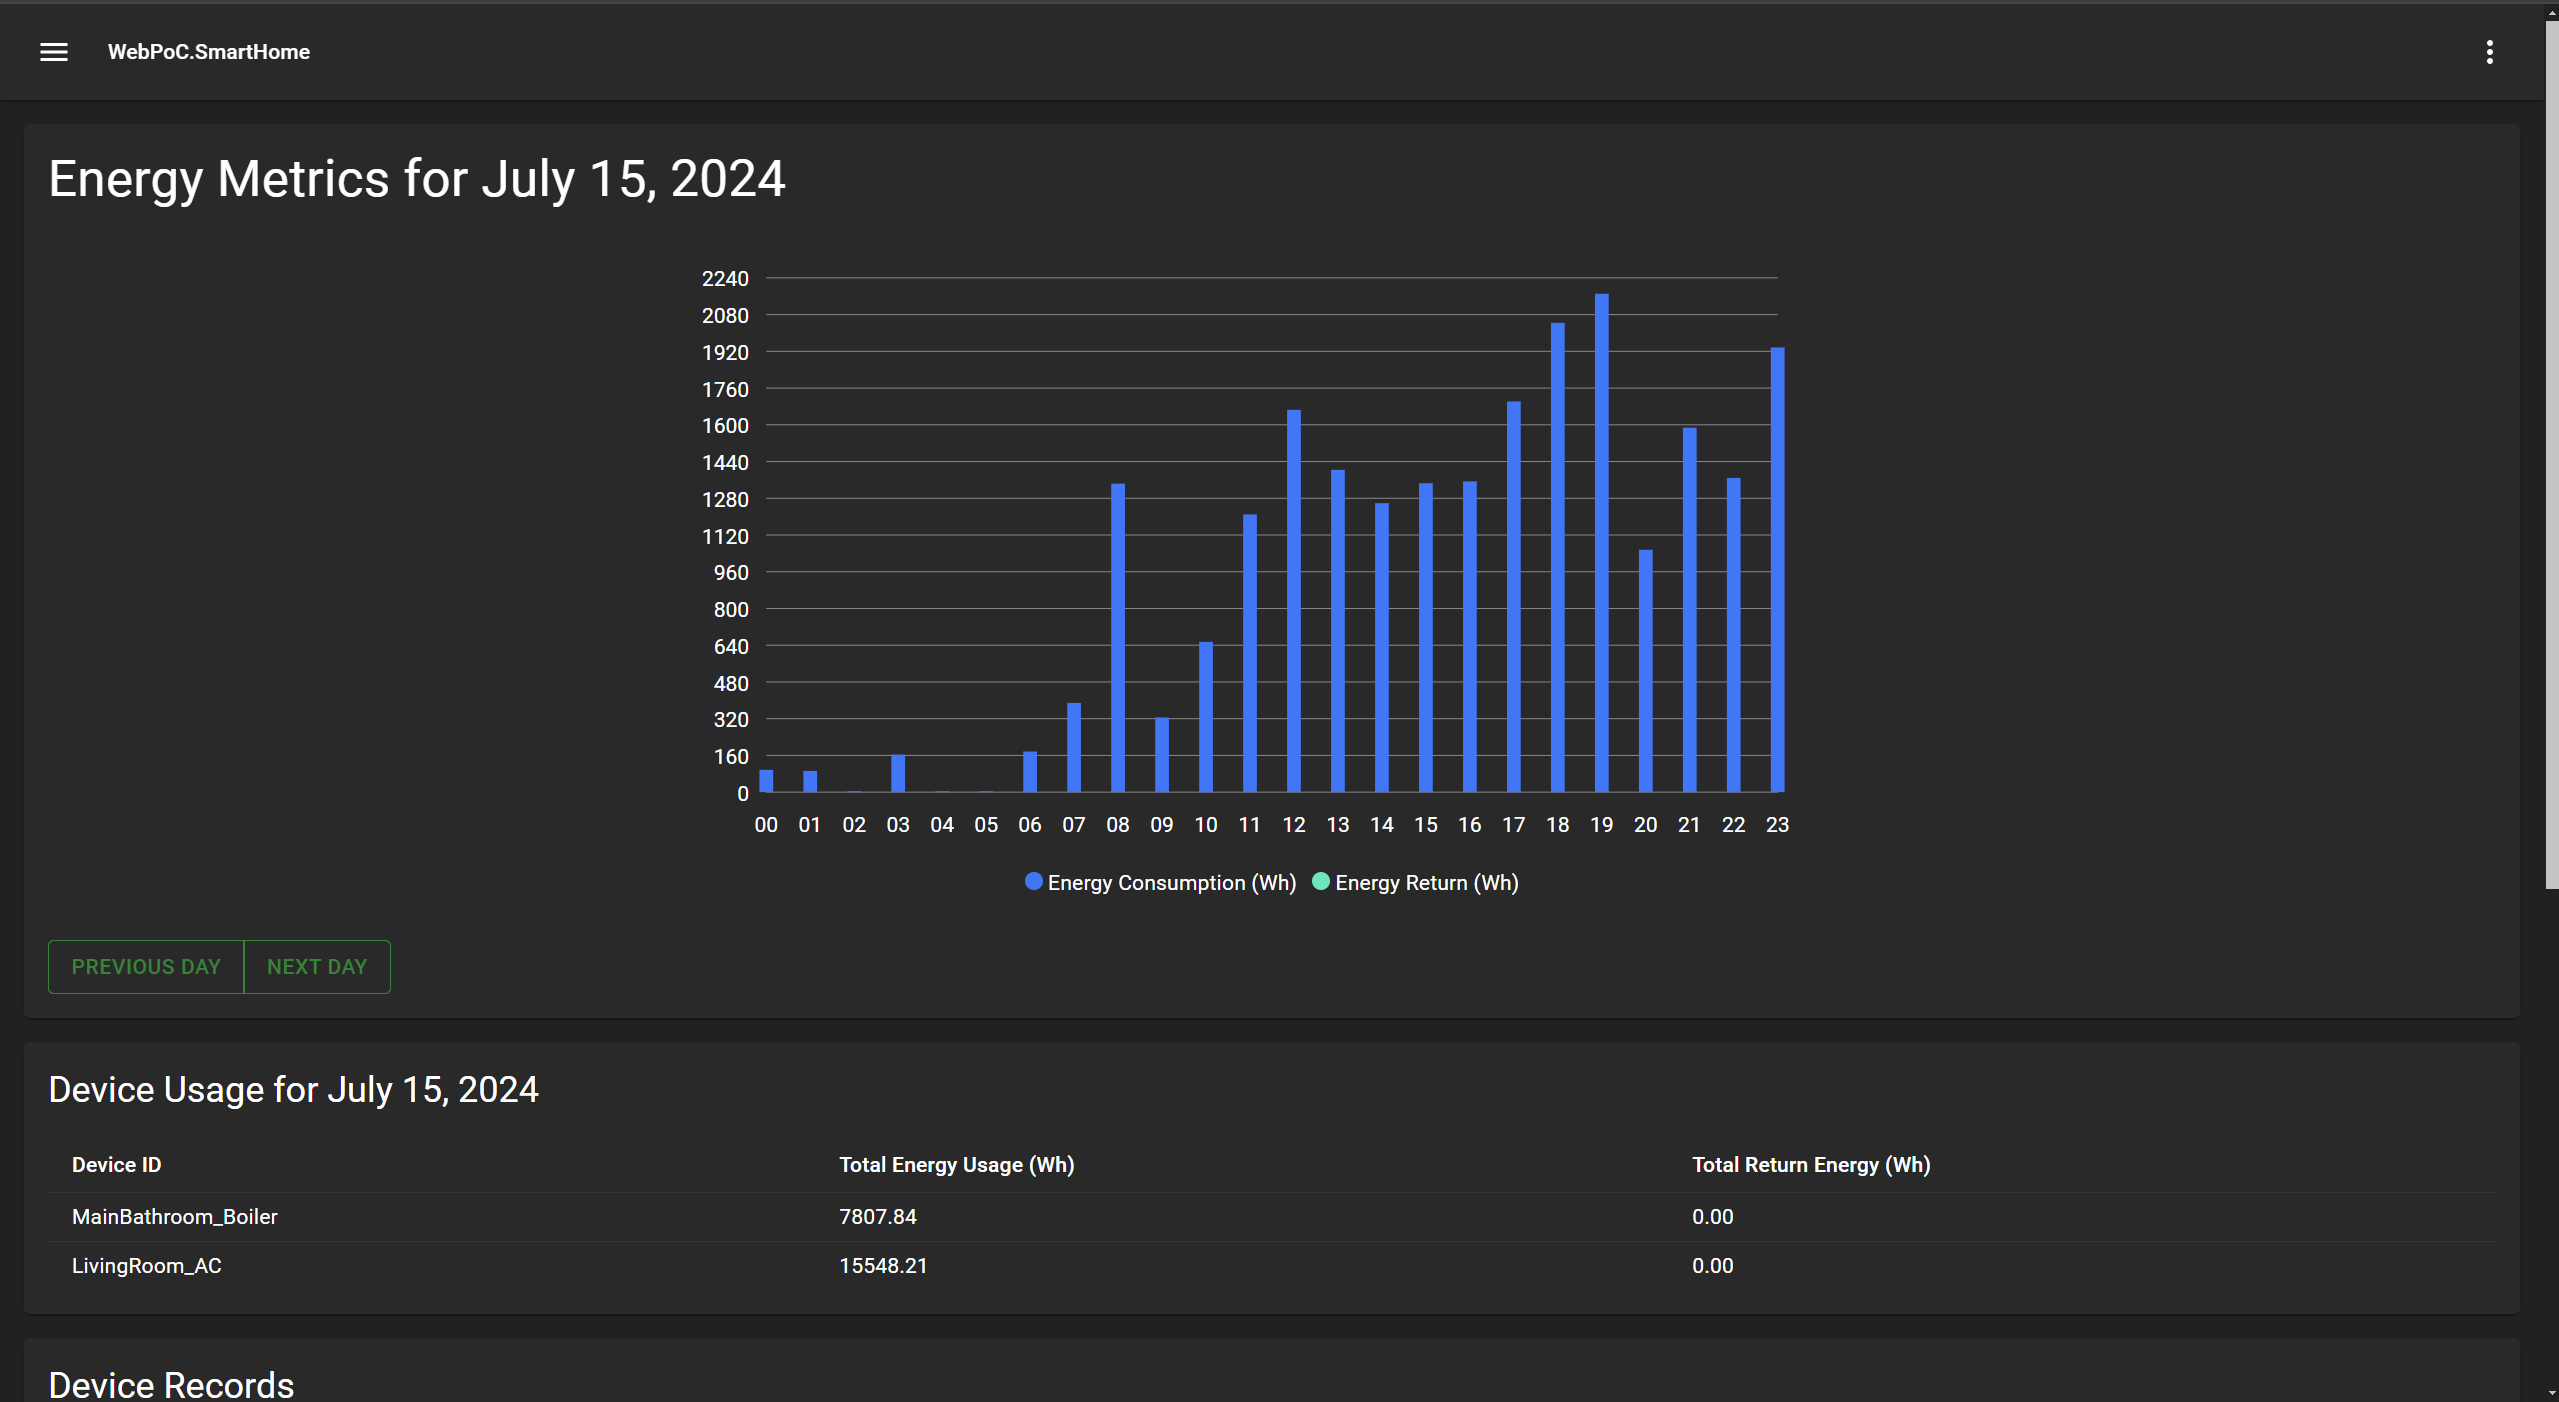
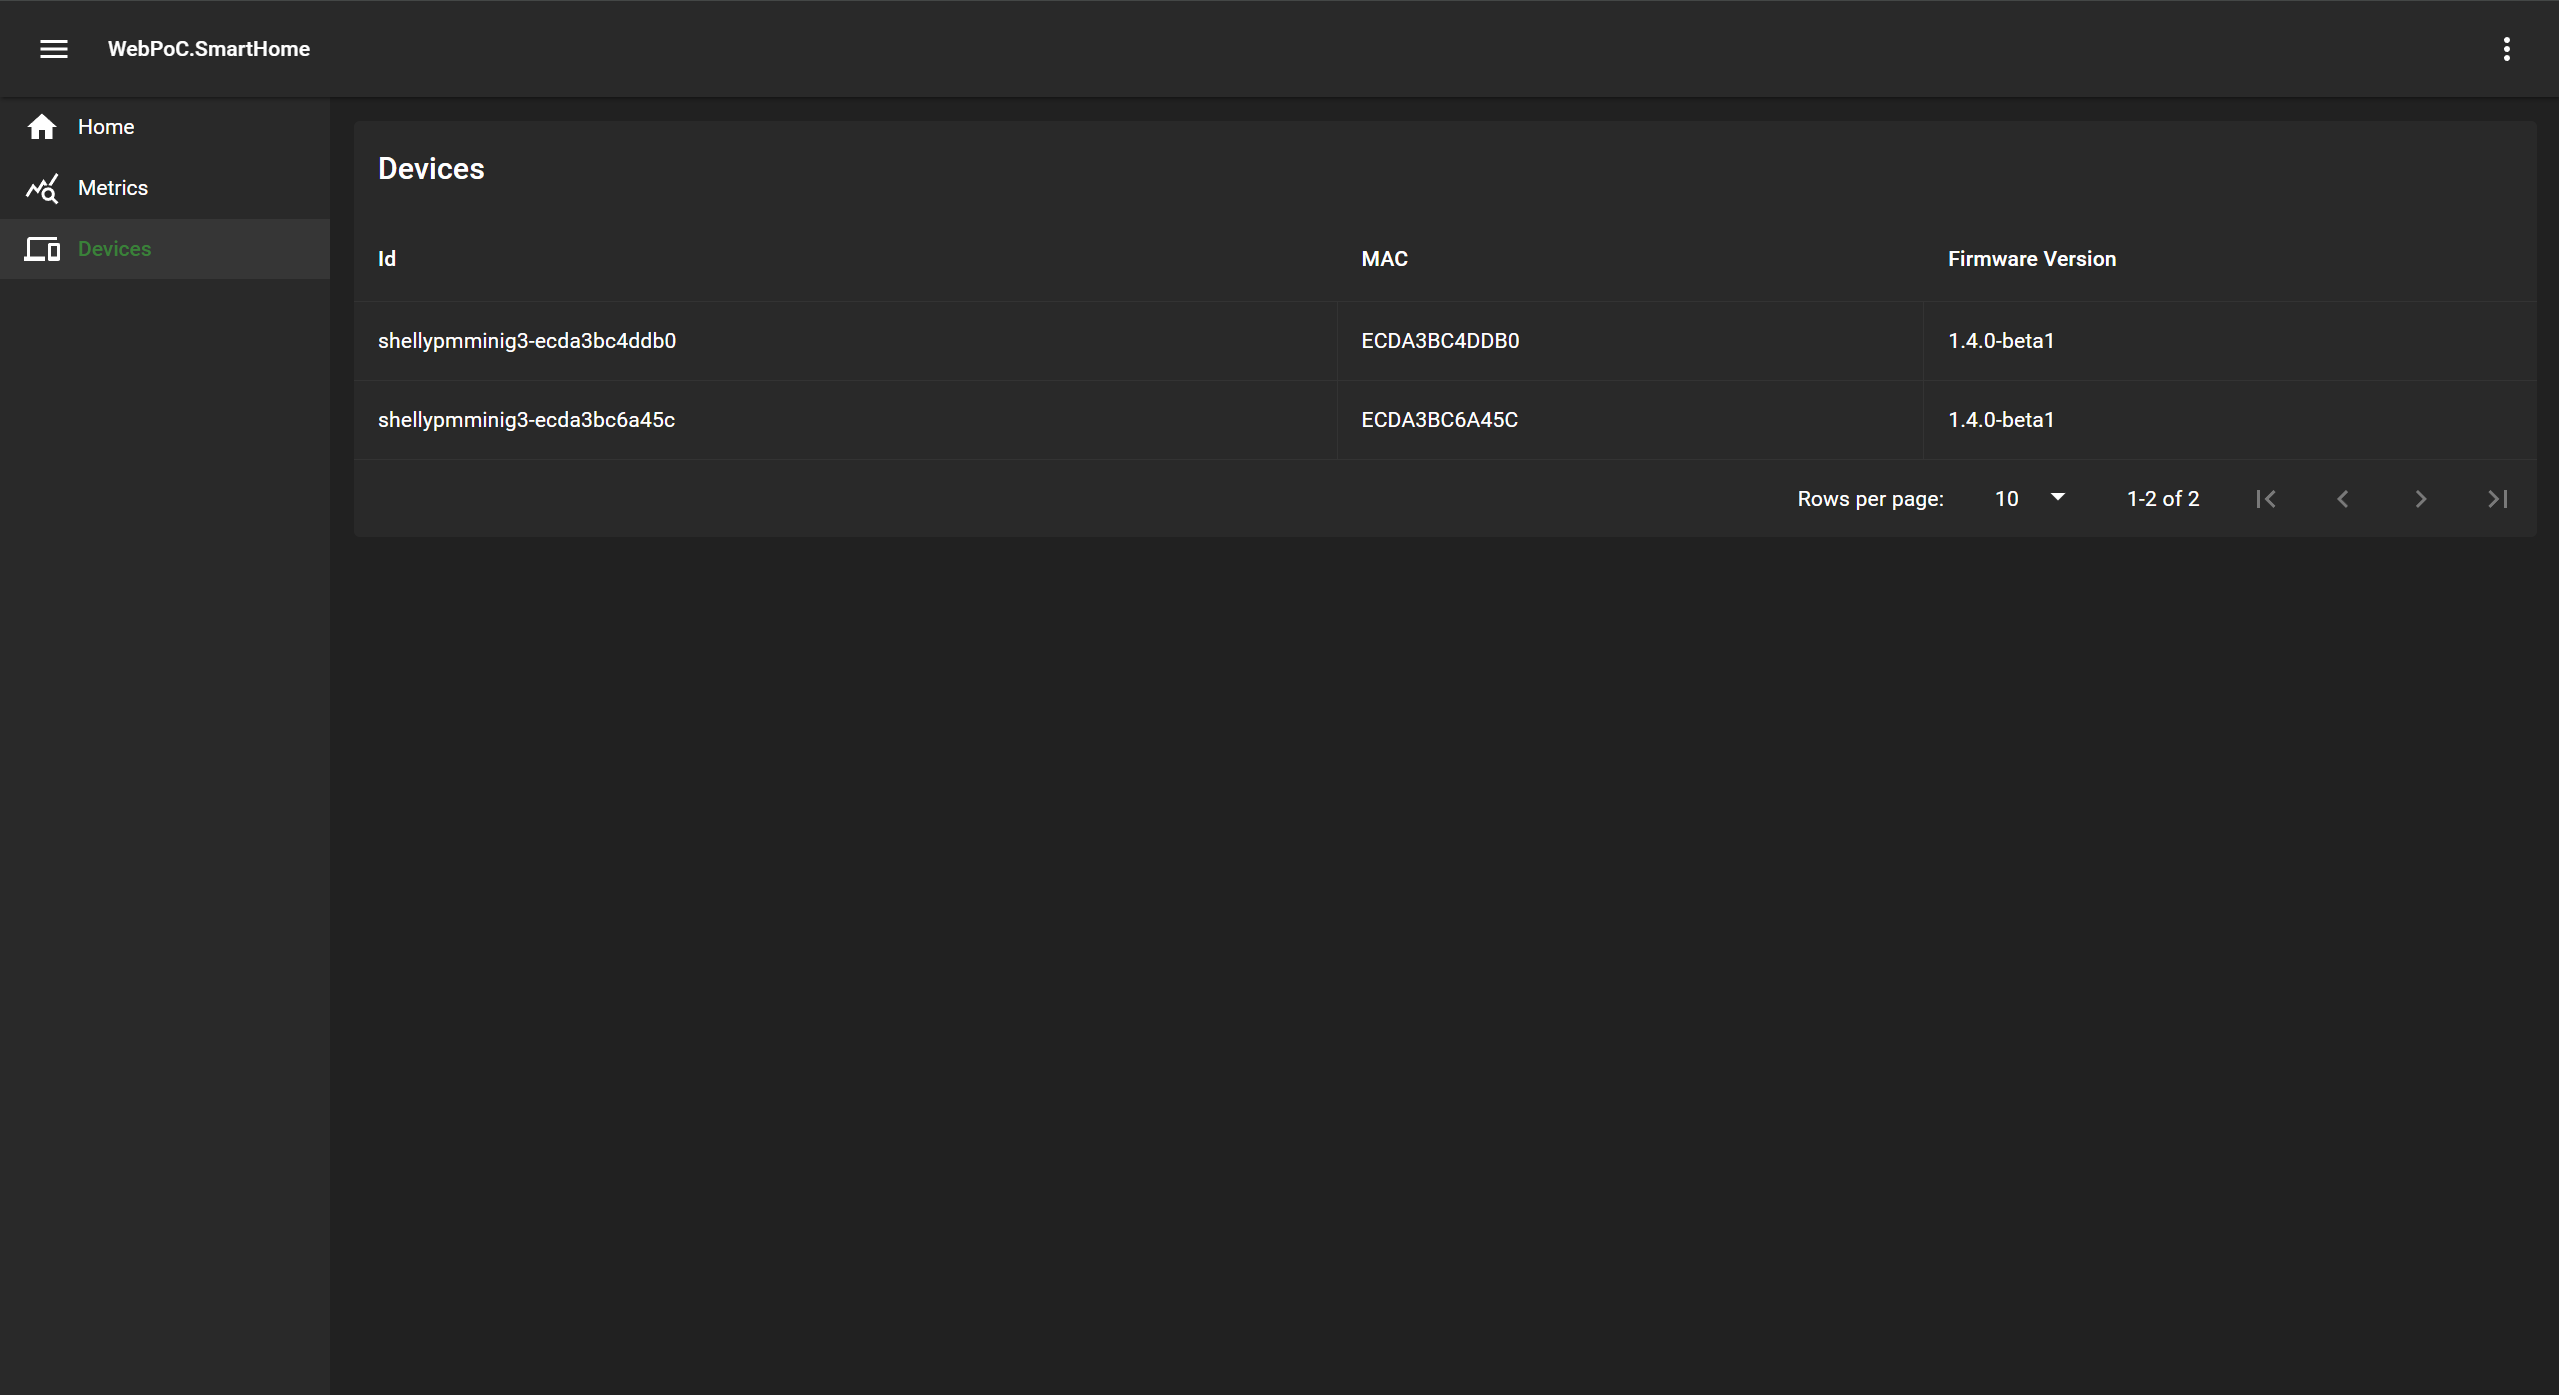
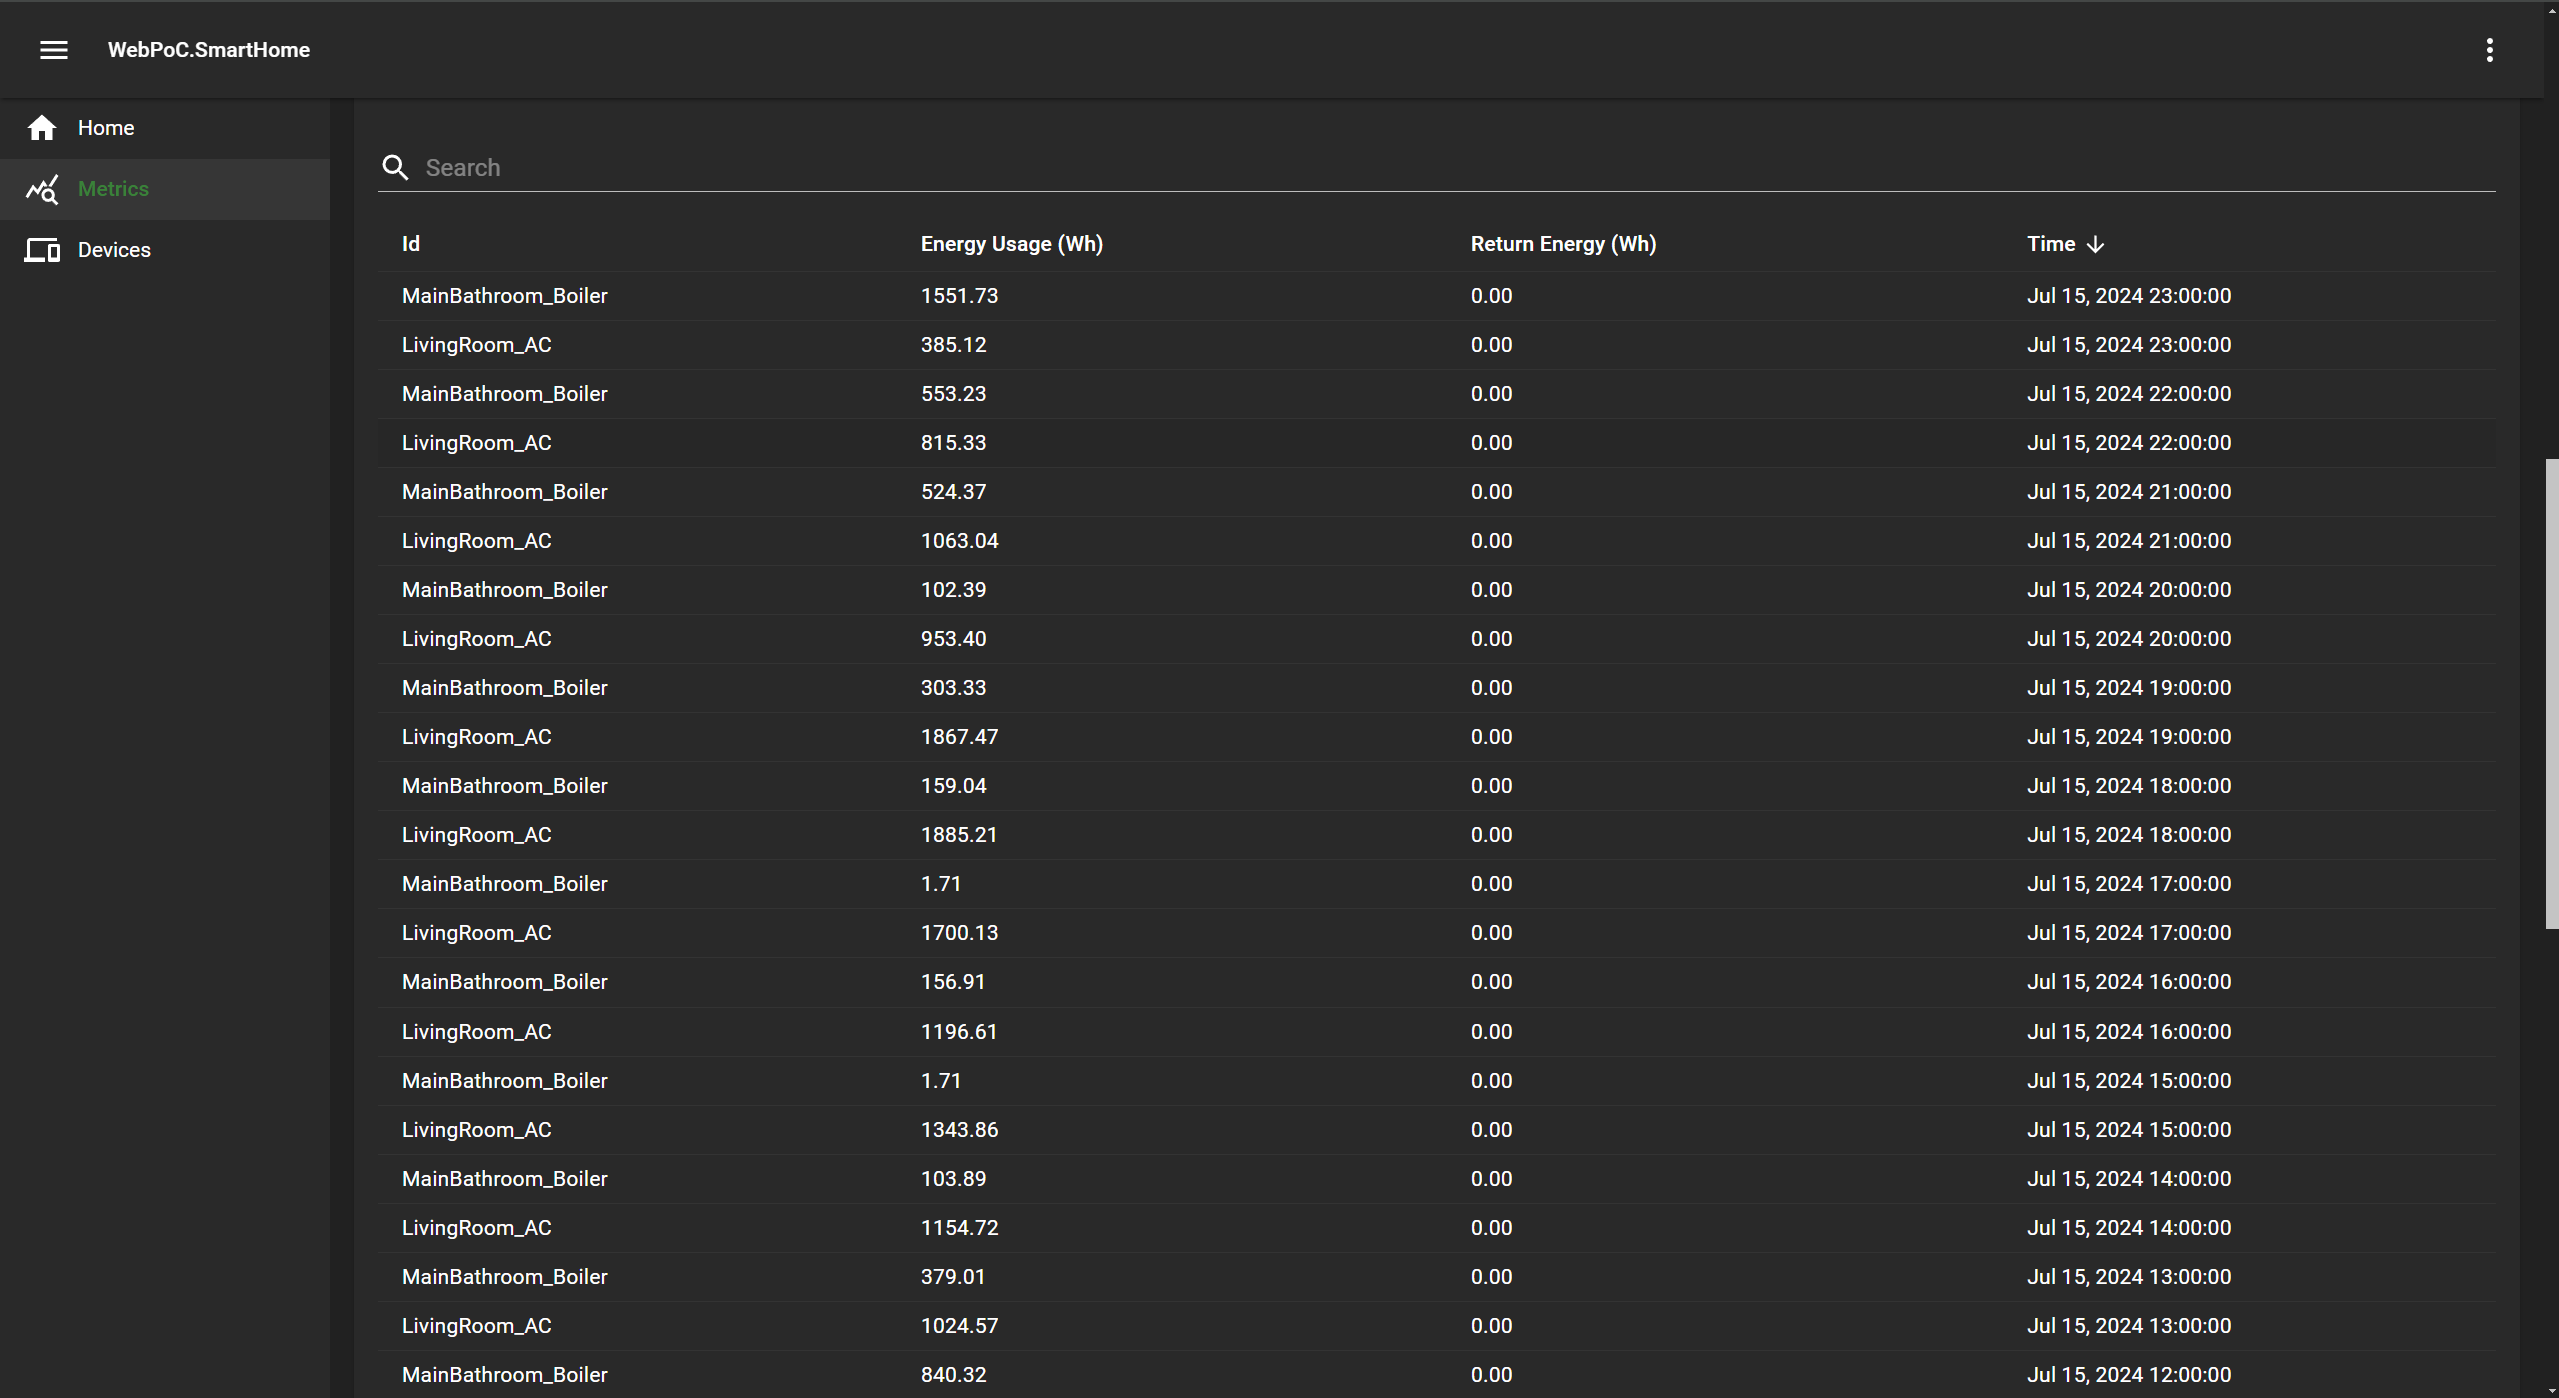
After that I made a basic app in C# (not the prettiest but it was meant as a PoC) to pull the data from Redis. Getting the final result was definitely relieving since I’ve skipped many of the problems I’ve encountered along the way, especially due to the lack of documentation. At the end I also succeeded to push data to Azure Event Hubs.
Automation
Concept
Automation is the process of removing the need of manual user configurations via application programming interfaces (API) or any other methods of transferring configurations. Automation features 3 main components:
- Configuration interface: The page where all the configuration details are entered by the user.
- Transferring application: Whatever method is used for transferring the configuration to its destination. In this case an MQTT broker is used in combination with the Shelly API/RPC components.
- Accepting Interface: Protocol that will accept, parse and write the data to the device. Shelly API/RPC as mentioned above.
The automation should be capable of automating both registration/integration, as well as updating/support and configuration. Successfully creating such automation for the product will increase the product marketability by making it more appealing to users with less knowledge and experience with technology.
Another benefit of automation is that it simplifies the installation and management of big electrical installations. For instance, if a customer makes an installation of a 100+ devices and wants to update the firmware, it will be tedious to do so without proper automation of the process. The same applies to any sort of configurations or changes to the devices.
Process
The process is split into 3 steps:
Initial network setup and configuration of the device. A customer can connect a meter device either himself/herself or by hiring a professional to do it. After installing the measuring device and integrating it with the application, the initial configuration will be sent to the measuring device using the Shelly RPC API. The Shelly RPC (Remote Procedure Calls) API is an API component for configuration and management of Shelly devices. Called with:
1
http://<ip>/rpc/Component.Option
Using
/rpc/MQTT.Option, MQTT can be configured from the web page, easiest way being sending a config using/rpc/MQTT.SetConfigwith the config parameter to upload the configuration made in the user interface to the device.For uploading a custom script to the Shelly device
/rpc/Script.Create,/rpc/Script.PutCodeand/rpc/Script.Startcan be used to create the script, upload the code and start the script respectively.Additionally, information about the Shelly can be gathered using
/rpc/Shelly.GetDeviceInfoand/rpc/Shelly.GetStatusfor the status of the device.SSL/TLS certificates and keys can be uploaded to the Shelly device using
/rpc/Shelly.PutTLSClientCert,/rpc/Shelly.PutTLSClientKeyor a bundle with/rpc/Shelly.PutUserCA.Support and updates for the device are necessary throughout its lifespan. By having a configuration interface in our application, we can easily carry out any updates or push configurations to the devices using the method specified above. Making these changes involves having our scripts and configurations stored without the variable data (unless the configuration already exists). When the client decides to create/modify a configuration, the application pulls/creates the configuration and replaces the values that are needed from the UI. Once that is done the configuration is sent to the device and uploaded. Firmware updates can be carried automatically or manually depending on user preference the same way.
Continuous logging is important to keep the user informed about the device’s integrity and events. Thankfully, this can also be done due to Shelly’s implementation of logs accessible at
<clientID>/debug/log.
Final Thoughts
This project ended up being a little internship project for me and I wrote a big PoC document with more details on the process. I am pleased with the result and would love doing something like this again. Thank you for reading!